I know how scary and intimidating programs like Photoshop are for beginners. That’s the reason a lot of educators’ graphic design skills usually involve a quick Google search and then right clicking.
This lesson is going to show you a simple, easy shortcut to creating images (course logos, gamification, buttons, infographics, etc) for your online courses and other projects.
The Tools
For this lesson, you are going to need:
- A Google Account
- A free, copyright safe image collection like pixabay.com.
- A way to make Screenshots (Macs: Command+shift+4) or (PC: Greenshot)
We are going to use Google to make a slide, like Powerpoint. After we create something cool, we are going to take a screencap of it so we can use it online.
It will look just like you made it in Photoshop but only take about 10 minutes.
Let’s get started!
Google Account:
Using the “Slides” App
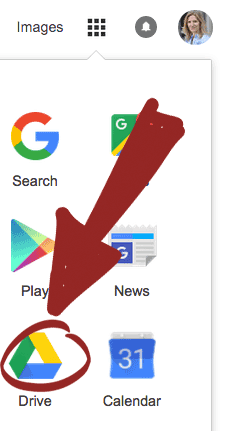
Google has many apps you can use, all found on your “Google drive”. This is where we are headed.
Sign in to Google. Then open up your Drive.
On the left hand side of your Drive, you will see a big red NEW button. Click it and select “Slides”.

Google Docs, Sheets and Slides are basically copies of Microsoft Word, Excel and PowerPoint. When you open “Slides” it’s going to look exactly like PowerPoint, which nearly every human on the planet is familiar with. Why I suggest Slides instead, is that it will be saved to your Google account online and is now accessible anywhere, on any machine.
You also have an almost unlimited assortment of fonts to choose from. Another added bonus of using Google.
You should now be looking at something like this:
Close the “Themes” pop up on the right hand side (click the x) because we are going to stick with a white background.
Time to start creating images.
Step 1: Playing with Fonts
The first step is to start playing with fonts. You can use the Title and Subtitle text blocks that are already there, or delete them and start from scratch (Insert >> Textbox).
Here are a few examples I made by writing on a Google Slide:
I played around with different fonts and colors. I chose a larger bold font for the main title and a lighter one for the subtitle. The key to choosing fonts is to pick one or two contrasting ones and then keep using them consistently in your project. Notice the color/bw, heavy/light, capped/regular contrast? This creates visual interest on the page. I’ll be getting into more detail about course logo design in lesson two.
Step 2: Insert an Image
After you write some text and choose an interesting font, it’s time to match it with an image.
I suggest you find a free, copyright collection of images online. My #1 choice is Pixabay. Search for an image you like, and save it to your desktop. If you have a folder for images that’s even better.
Beginner Tip: The term for clipart is now “vector image”. This basically means anything that isn’t a photograph. Vector images are much nicer than the old “clipart” from the past.
Once you find a picture you like, save it to your desktop. Here’s how to insert it into the Google Slide:

Here is one of the examples above, with an image added to it:
Step 3: Working with Layers
Whenever you have something on a Google Slide, like a image or writing, it is sitting there in its own layer. You can drag objects around and change the order, sending them forward or behind other objects.
I needed to send the brain image behind the writing because it was blocking it. Right clicking is all you need to do.
I inserted the picture, dragged it around a bit, then sent it behind the text:
So now that you have a nice image designed on a Google Slide … how does it become an image you can use in your online course?
Step 4: Creating an Image by Taking a Screenshot
You probably noticed that images are files with certain endings like .jpg or .png or gif. You need to save your creation in Google Slides into a image file with one of those endings. Then, you can upload it into your course or other online project.
There are MANY ways to save your creation as an image file but none of them are as simple as just taking a screen shot. The process looks like this:
- Turn on the screenshot tool
- Use your mouse to click and drag a little rectangle around your creation in Google Slides
- Shazaam! Everything inside that rectangle instantly gets turned into a picture file
- Save it to your desktop (or image folder)
That’s it.
For Macs: Command+shift+4
This will activate the built in screenshot tool that all Macs have. Click and Drag. File appears on your desktop. Done.
For PC: Install Greenshot … (It’s quick, free, and will save your life)
Turn on Greenshot. Click and Drag. File “save as” onto your desktop. Done.
Tip for Macs: Screenshots on a Mac computer get saved with a long, ugly file name which you can rename with something nice like “psychology-logo.png”.
Coming Up Next
There are so many creative possibilities when you create the graphics yourself.
In next week’s lesson, we’re going to look at how to make a killer course logo, and then how to use that logo in different ways throughout your course.
Thanks for reading and be sure and follow me on Twitter for more design tools and ideas.


Leave A Comment